Volvo 88890300 Vocom Interface for Volvo/Renault/UD/Mack Truck Diagnose With WIFI Support Online update. It was developed to make repair shop tasks easier and more efficient. Vocom can be used in the repair shop, out in the field, at the roadside, or during test drives.
1. Volvo 88890300 Vocom Interface is a diagnostics application that covers the whole repair process through the use of plug-ins. 2. With Volvo 88890300 Vocom Interface you can diagnose, test, calibrate, and program a product. A product could be a vehicle, engine, or a machine. 3. Volvo 88890300 Vocom Interface provide functions for updating the tool, communication with the product, and other external applications. The set of plug-ins, user authorizations, and available languages is adjustable to provide every user with what they need. 4. This device support WIFI connection.
ALLDATA 10.53 professional workshop service and repair manual, maintenance, wiring diagram, diagnostic, all cars & light trucks 1983-2013.
Alldata database Feature :
ALLDATA 10.53 is the leading computer-based diagnostic, repair and estimating information system, it can help you boost shop performance and build customer loyalty as you efficiently repair more makes and reduce comebacks. The most comprehensive information for 1982 to present vehicles, updated quarterly OEM images, diagrams and diagnostic flow charts Parts and labor information Maintenance schedules Manufacturer TSBs and Recalls Integrated estimating software OEM wiring diagrams with connector, ground, power distribution and splice information A2Z Component Search – the fastest route available to component information Whether you measure productivity by the number of vehicles repaired in a day, the variety of vehicles you’re able to work on, or the time spent on diagnosis and repair, using the right information and shop management tools is vital to the success of your business. ALLDATA can help you succeed in every way.
some customer cant install the Alldata 10.53 or cant run this software after install the software.
Please note following information how to solve those problem.
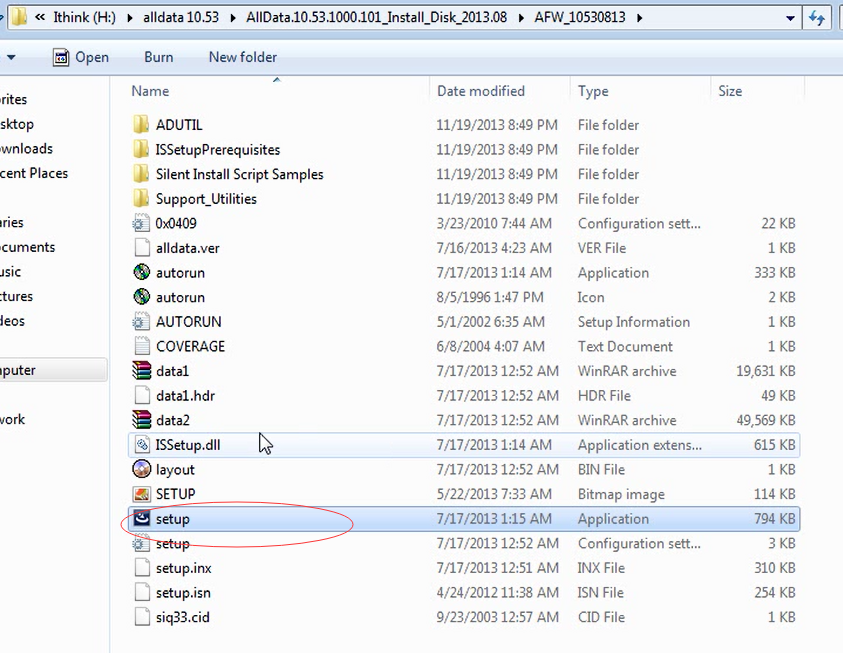
1. First,if you pc has anti-virus software.pls close that. and if you pc is with network,disable the network or unplug the network cable. 2. Then open the hdd.open the alldata file.open the file”alldata 10.53\AllData.10.53.1000.101_Install_Disk_2013.08\AFW_10530813″
choose”set up”to install the softwarealldata .
as picture:
Most problems that the customers meet:
double press setup, but no action or shows wrong information,maye setup file is damaged or cant be used.
Setup file is 794KB,if the memory of this file is change, then it is means this fie is damaged. In order to avoid this problem, we have put a copy file for setup file, please open remark file:(AFW_10530813.iso)to reback, as following:
3. Please install the ALLDATA software as indicate, then there has a alldata logo on your computer as following:
4. But when you want to run this software, it cant be run before you active the file as following: so please active the file as picture firstly.
open the file”AllData.10.52_Crack.only” as picture:
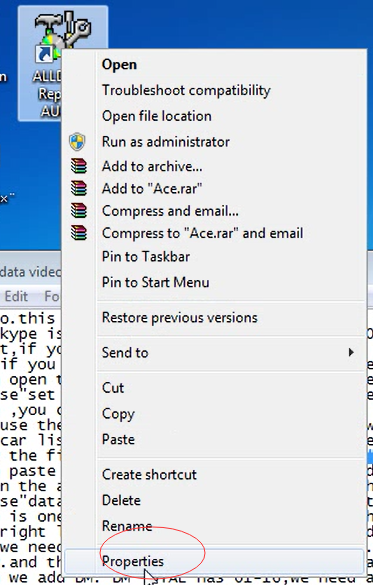
copy the file”ace”.press right key of ALLDATA logo on computer. choose”properties”,choose”open file location”
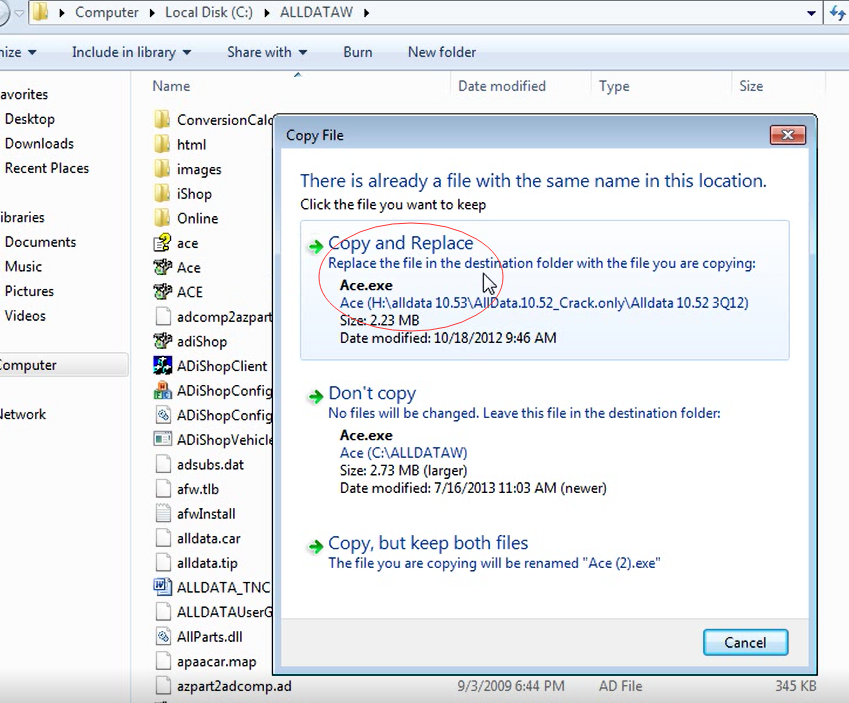
then paste in this file,here choose”copy and replace”.then the software has been finish.
As following: Now you can use ALLDATA now.
Some customers will meet the problem as following:
If you also cant run ALLDATA, then it means the active file with problem.
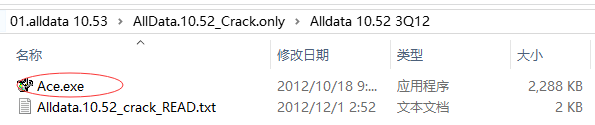
The normal “ace.exe” filel is 2288KB,as picture:
If the size of “ace.exe” is changed,please use our copy “ace.exe” to active. We have put this file under alldata as picture:
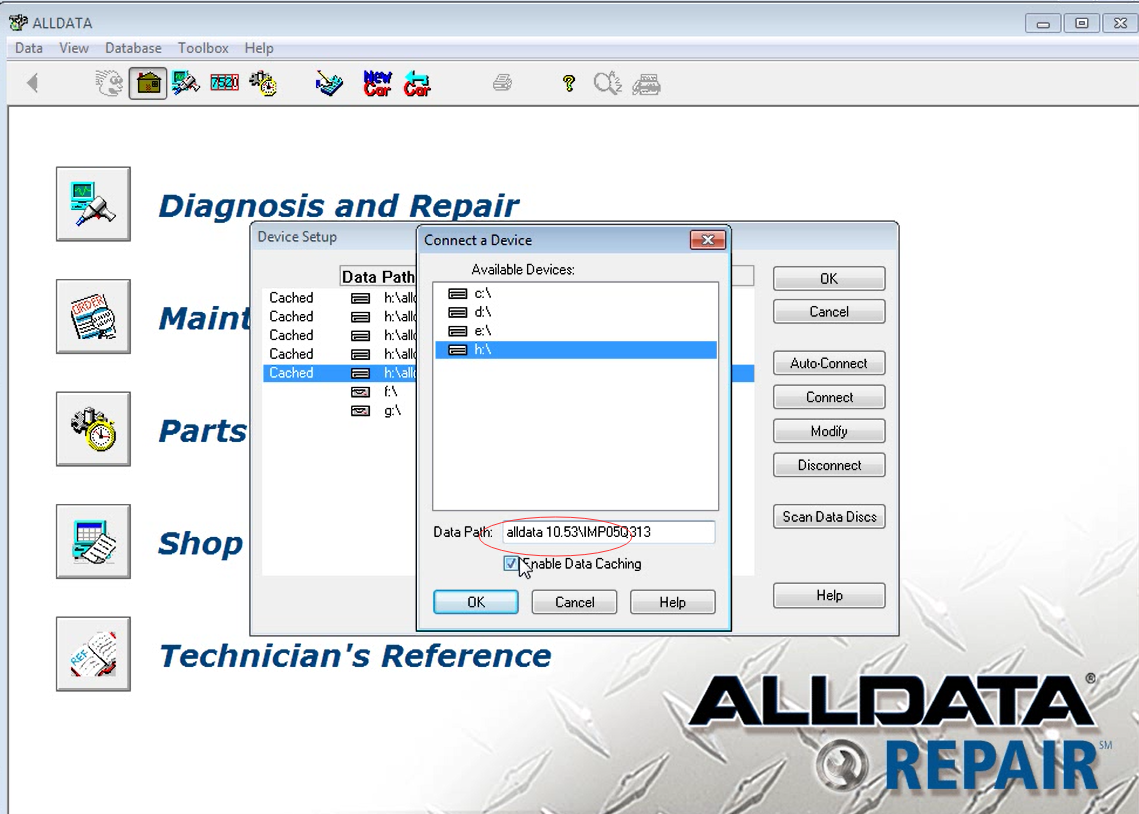
6.open the alldata.now we add database to the alldata.choose”data”,choose “device”.choose “connect”
here is one thing to take care. beacuse each pc has differnt letter.so you need choose the right letter. for expalme.i put the alldata on H,so i choose “h”.if you pc myhdd is g.,you need choose g.
now we need to add databse.add dm and imp.dm1 is”H:\01.alldata 10.53\DM01Q313″.so we choose h.
and copy.and the paste.you need choose”enable data caching”
then we add DM. DM TOTAL has 01-16,we need add one by one,.from dm1 to dm16.
watch my step.now add imp file. it is has imp01-imp70.watch my step.also need from 01-70.one by one.
you must add one by one,from imp01-imp70.i skip this.you can add yourself.
after all add,.check ok.and then you can free to use the software now
There have many diagnostic interface for vag group vehicles, ODIS vs VCDS vs VCP which one is the best? there Autonumen.com will share some different for you.
ODIS is OEM, so it fully supports every VAG model, and it’s best for flashing, but it’s slow and you need online connection for being able to do a lot of things, Wifi Vas 6154 head should run faster with ODIS than 5054A
ODIS 4.2.3 Software+ODIS Engineering 7.2.2+Elsawin 5.3+Etka 7.5 Plus 5 IN 1 Software is latest vas 5054a vas6154 diagnostic software for Sale:
VCDS is super fast, best to read DTC’s and do basic stuff (diagnosis) and some simple coding, but it doesn’t work well with new MQB platform.
Vagcom 17.8 HEX CAN USB Interface VCDS 17.8.1 online update version support 16 languages
1. The product can use the official software and update online, so you can always get the newest software version( VAG COM 17.8.1 some version already update ). 2. You can get access to Internet when using this product and not easy be locked. 3. This product can support long coding,fast scanning fuctions. 4. It supports 16 Languages.( Support 16 languages, including of Chinese, English, French, German, Russian, Italian, Swedish, Danish, Czech, polish, Dutch, Hungarian, Portuguese, Spanish, Slovenia, Romania.) 5. It supports Firmware update online ( not NEC project), always the newest version.
VCP is little bit a mix of those, best for parametring and quick eeprom read and DTC fast read every feature (coding & programming) is done offline. VAG CAN PRO VCP 5.5.1 doesn’t need engineer codes for coding or programming ,work very well with MQB
VAG CAN PRO CAN BUS+UDS+K-line 5.5.1 VCP Replace VAS 5054A ODIS
1. Newest Version V5.5.1 2. Diagnosis Better and faster than VAS 5054A 3. supports coding and programming, NO need engineer codes for coding or programming 4. supports CAN BUS, UDS, K-line protocols 5. Support Volkswagen, Audi, Seat, Skoda, made from 1990 to 2015 6. Multi-language:English, Czech, Danish, German, Hrvatski, Italian, Dutch, Polish, Russian, Spanish 7. Operation system: Windows XP, Windows 7
Got BMW ICOM Next not connecting to ISTA because it need firmware update I try to login with internet explorer but I didn’t get the setup page. I don’t know if it’s IP problem or what. Here is the itool radar shot: Advice:
Try that: 192.168.8.1:60080 LOG IN with following: Username: root Password: NZY11502 or NZY1150263
Download iTool Radar, connect the ICOM directly to your computer, and it should read the ip address from the ICOM. Once you have the IP address, then you can proceed to log onto it using chrome or microsoft explorer browser with the provided credentials above.
If you did exactly as above, but with no luck. Then make an restore usb and reflash with this!
Download from this mega: BMW_ISPI_ICOM_NEXT_FW_3.15.03_files.txt
Then create a restore USB by following the following instructions:
A portable USB mass storage device (USB stick) that is at least compliant with USB 2.0 and is formatted with the FAT32 file system is required as additional hardware.
1. Create a text file user.settings with the following content: ConnectionMode=xxxxxx * 1 (default *2 : DHCP) Ip=xxx.xxx.xxx.xxx (default: 0.0.0.0) Netmask= xxx.xxx.xxx.xxx (default: 0.0.0.0) Gateway=xxx.xxx.xxx.xxx (default: 0.0.0.0)
Pay attention to the upper and lower case letters!
* 1 Possible parameters for ConnectionMode: STATIC_IP, DHCP, APIPA * 2 default = factory settings
2. Copy the file user.settings onto the USB stick. 3. If the ICOM NEXT A is ready for operation (SYSTEM LED permanently lights up green), the USB stick is to be connected to the unit (a connected MOST diagnosis adapter is to be unplugged). The red light chain starts after approx. 10 seconds (see 4.2.7.).
The saved settings are persistently overwritten. The green light chain starts once all the data has been updated. In this state, the unit can be addressed at the new IP (even without a restart). If the red light chain does not start, the user.settings file on the USB stick could not be read. If the green light stays off, an error has occurred while the LAN configuration was being written. For analysis purposes, the ICOM NEXT A saves the file user.settings.log with the error description to the USB stick.
or possibly as follows after that you copy the necessary files:
1.4. Press and hold the button located on the right-hand side of the ICOM Next, next to the OBD II cable connection socket.
1.5. Continue to hold the button, connect the device to the vehicle’s OBD II jack and keep the button pressed until the LEDs on the ICOM Next glow red.
1.6. Release the button and within five seconds, push the button three times. This starts the firmware update.
Note: The update may take several minutes. Do not disconnect the ICOM Next as long as any LED glows red.
1.7. When all LEDs on the ICOM Next have stopped glowing, the Emergency Firmware Update is complete. You can now disconnect the USB flash drive.
1.8. IMPORTANT: When the Emergency Firmware Update is finished, the ICOM Next must be connected to your network with a LAN cable in order to be reconfigured since all previous settings have been lost. If there is a “user.settings” file on the USB flash drive, it will be installed after the firmware update.
Final update:
This login is for original next or clone/orig A1, A2 for sure.
I try to login to ip: 192.168.8.1 LOG IN with following:
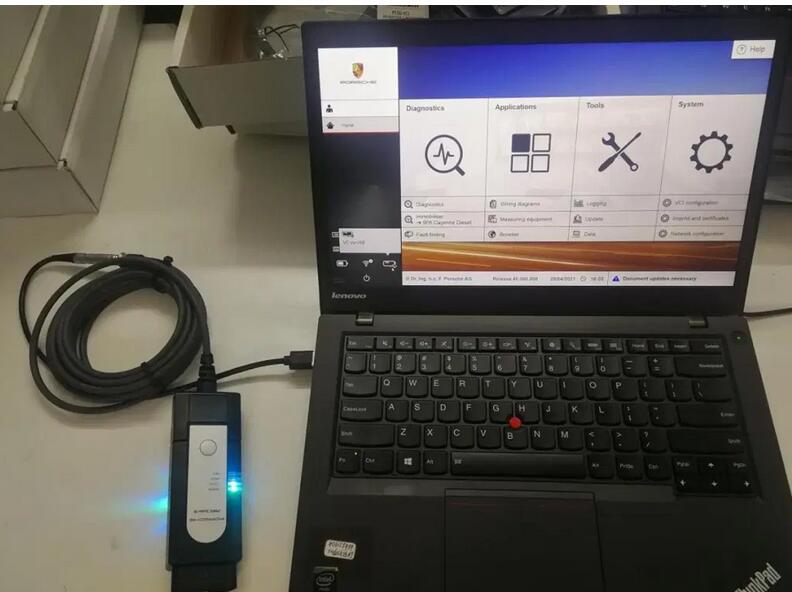
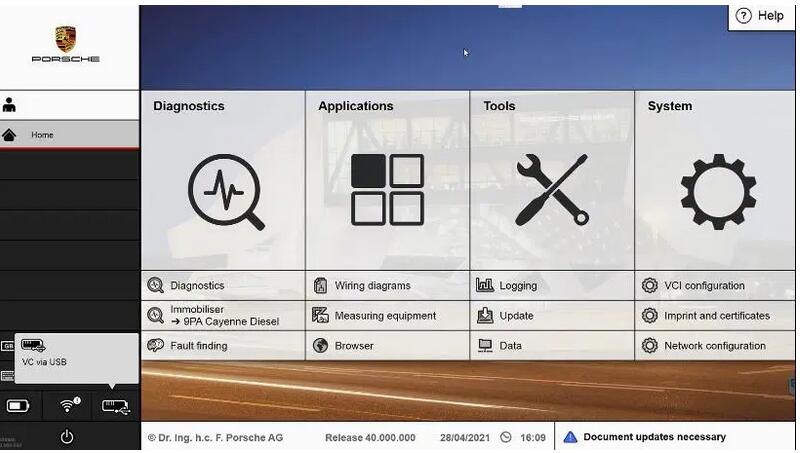
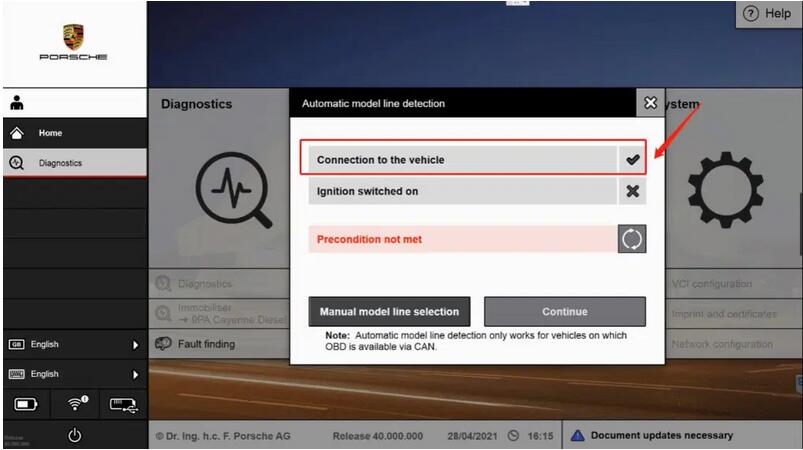
1.Porsche PT3G connects to Piwis 3 diagnostic computer, you can connect to USB only, or connect to the vehicle;
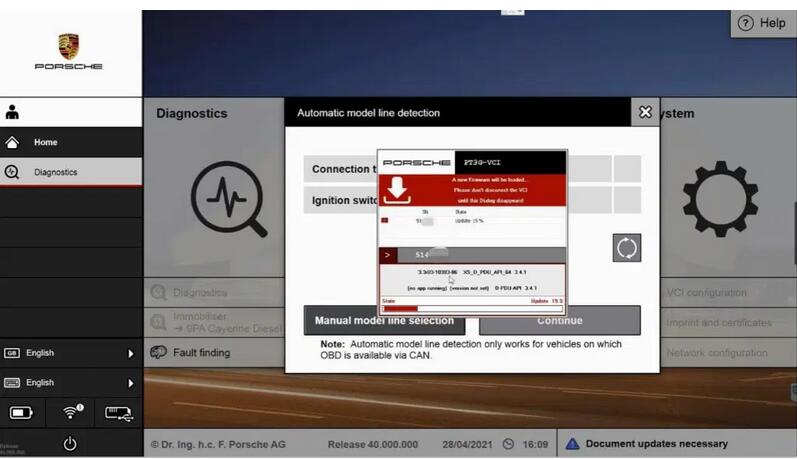
2.If the connection is successful, you can see the USB connection status in the lower left corner of the screen, and then click Diagnostics.Porsche PT3G VCI will automatically update the firmware;
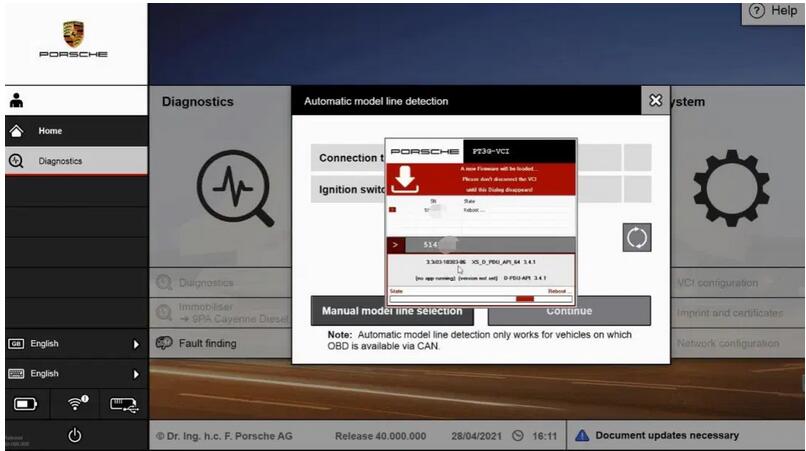
3.The Porsche PT3G VCI firmware update is complete, and the Porsche PT3G VCI diagnostic connector will reboot;
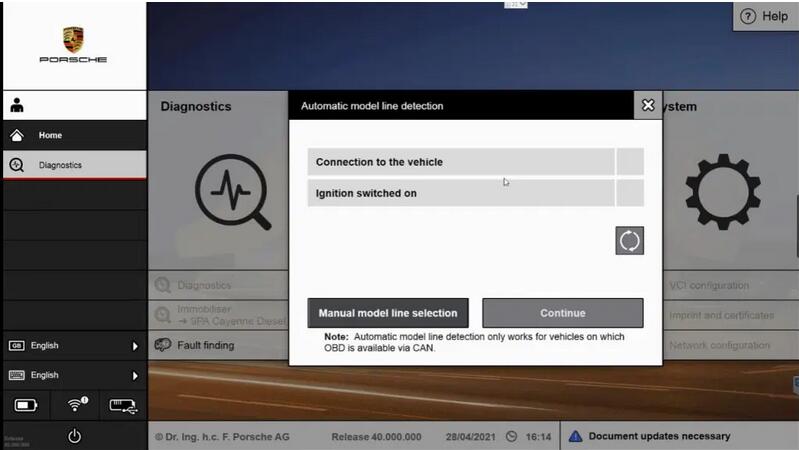
4.If you only connect the USB, it can’t be tested. You need to connect to the car, then connect to the computer’s USB port, click Diagnose, and the Porsche PT3G VCI will automatically recognize the vehicle communication.